🍀 At Crochetisimo, we believe in the magic of the hands and the soul that is woven into each creation. We present a specialty designed to caress the skin of the little ones: the baby blanket with crochet clover motifs. Clovers, signs of fortune and hope, are intertwined in a design that combines pastel colors, evoking tenderness, calm and sweetness.
🍀 Ideal for moments of rest and snuggles, this blanket not only offers comfort but also a touch of elegance and originality. Each masterfully detailed clover leaf reflects the commitment to offering unique pieces. We invite everyone to discover this project, another example of the excellence and passion that we put into each stitch.
Measure:
The blanket measures approximately 96.5 cm x 106.5 cm.
Materials:
3 skeins of 1 White (A), 1 skein each: Light Sea Green (B), Pale Pink (C), and Jewel Blue (D).
2 skeins of White (A), 1 skein each of Melon (B), Baby Pink (C), and Light Blue (D).
Crochet hook: 5.5 mm (US I-9).
Go to work
Here is the translation of the crochet pattern:
Sample:
Each Block = 10 cm square. REVIEW YOUR SAMPLE.
Use any size needle to obtain the specified sample.
Crochet Baby Blanket Pattern with Clover Motifs
Abbreviations
ch = chain
sc = single crochet
pd = double point
triple = triple point
CC = contrast color
pt(s) = point(s)
Colors :
A = color A
B = color B
C = color C
D = color D
CC = contrast color
Others :
mm = millimeters
* = repeat what follows * as indicated.
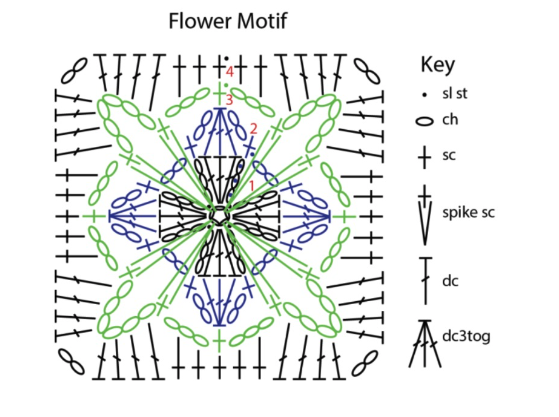
Crochet Clover Motifs
(Make 24 blocks, each with B, C or D as CC)
With CC, ch 4; join with slipped stitch in first ch to form a ring.
Round 1 : Ch 4 (counts as triple), 2 triples in the ring, ch 3, [3 triples in the ring, 3 ch] 3 times, slipped stitch at the top of the starting chain. End with CC.
Round 2 : Join A in any ch 3 space, ch 2 (counts as sc), *sc in the same ch 3 space, insert needle into center ring, yarn over and pull out a loop, yarn over and pull loop through both loops on needle – long sc done, 2 sc in same ch 3 space, ch 3, sc in next ch 3 space; repeat from * around, slip stitch at the top of the initial chain – 4 sc and 1 long sc each side.
Round 3 : Ch 3 (counts as dc), *dc in each dc and long dc, dc in ch 3 space, ch 3, dc in same ch 3 space; repeat from * around, slip stitch on top of starting chain – 7 dc each side.
Round 4 : Ch 1 (counts as dc), *dc in each dc to ch 3 space, 5 dc in ch 3 space; repeat from * around, sc in 2 sc, slipped stitch on top of starting chain. Finish with A – 7 sc each side and 5 sc in each corner.
Round 5 : Join DC in any sc, ch 1 (counts as sc), *sc in each sc until the 3rd sc of the 5 sc, skip the 3rd sc, work long sc in the ch 3 space of Round 3; repeat from * around, sc in first ch, slipped stitch to top of starting chain. Finish with CC – 11 sc between each long corner sc.
Completion
Following the assembly diagram, arrange the Blocks into a rectangle, 8 Blocks wide by 9 Blocks long. Join the Blocks with an overcast stitch.
Should
Round 1 : Join A at any point and ch 1, sc in each stitch around, working 3 sc in each corner, slipped stitch into starting chain. Ends with A.
Round 2 : Repeat Round 1 with D.
Round 3 : Repeat Round 1 with B.
Picot Round : Join C in any stitch and ch 1, *sc in next 2 sc, ch 3, slipped stitch in first ch – picot done, sc in next stitch; repeat from * around, slipped stitch in initial chain. Ends with C.
Hide the strands.
Diagrams