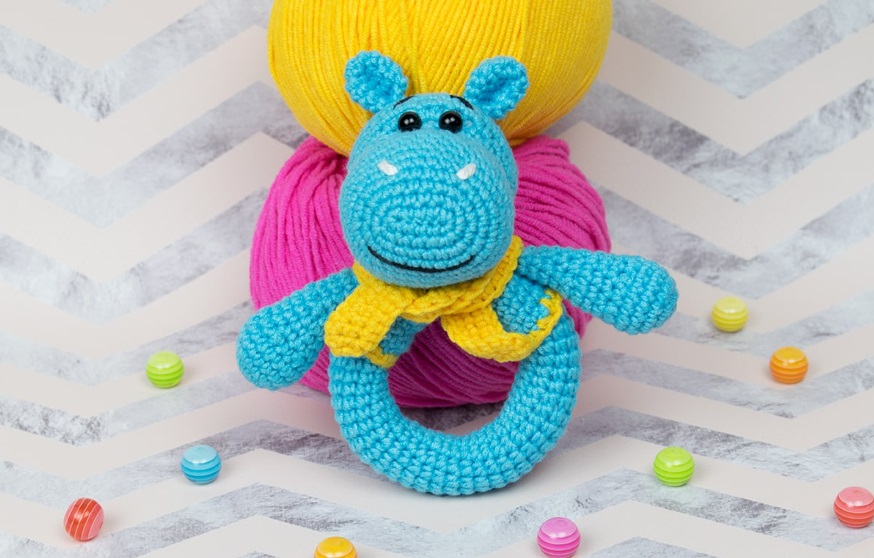
This rattle in the shape of a cute amigurumi hippopotamus will become one of the favorites of the babies in the house . In addition to being beautiful, this woven piece is very useful to help the little ones develop their motor skills
Abbreviations
✅ V: Return.
✅ Am: Magic ring.
✅ Pc: Chain.
✅ Pb: Low point.
✅ Inc: Increase (2 sc in one point).
✅ Dec: Decrease (2 sc together).
✅ Pr: Sliding point.
✅ (…): Repeat what is shown in parentheses the indicated number of times.
✅ […]: Total number of points.
Materials
✅ Blue and yellow yarn (55% cotton, 45% acrylic) – 160 m / 50 g.
✅ 2.0 mm hook.
✅ Black and white embroidery thread.
✅ Reliable safety eyes (6-7 mm) or black thread for embroidering eyes.
✅ Fiber filling.
✅ Small plastic egg/container (like a kindergarten surprise egg) with beads.
✅ Scissors.
✅ Tapestry needle.
Measures
✅ The finished rattle measures approximately 12-13 cm.
Instructions
Important note: Toys with small plastic parts should not be given to children under 3 years old. We highly recommend embroidering the eyes instead of using plastic eyes.
This pattern shows how to make a rattle without a wooden ring, but if you want to use one, weave the base parts of the rattle (ring and half ring) around it, starting with the ring and ending with the half ring.
Semi-ring
Knit 15 pc and join with a sl st to make a circle. Start each round with 1 sc and finish with sl. Continue knitting around for approximately 18 rows. Work sc along the edges of the half ring with yellow thread. Fasten and weave the ends.
Ring
Knit 12 pc and join with a sl st to make a circle. Continue weaving around in a spiral for about 45-46 rows. Now you will have a cylinder. Insert it into the half ring, then join the ends of the cylinder with the sewing needle to form a ring (don’t forget to fill). Fasten and weave the ends. Hide the seam by moving the semi-ring.
Arms (bundle 2)
V1: 6 bp in am. [6]
R2: (Inc) repeat 6 times. [12]
R3: (Sc in next stitch, inc) repeat 6 times. [18]
V4-5: Pb in all 18 points. [18]
R6: (Sc in next stitch, dec) repeat 6 times. [12]
V7-9: Pb in all 12 points. [12]
R10: (Sc in next stitch, dec) repeat 4 times. [8]
R11-14: SC in all 8 points. [8]
Fill.
V15: (Dec) repeat 4 times. [4]
Close the hole. She fastens and leaves a tail for sewing.
Ears (bundle 2)
Knit with blue thread.
V1: 6 bp in am. [6]
R2: (Inc) repeat 6 times. [12]
V3-5: Pb in all 12 points. [12]
Flatten the ear and crochet sc in the next 6 stitches through both layers, this will close the hole. Then fold the ear in half and sew the bottom edges together.
head
Knit 6 pc with blue thread. Continue working around the base pc starting from the 2nd pc on the hook.
R1: sc in the next 4 stitches, 3 sc in the last stitch, turn, sc in the next 3 stitches, inc. [12]
R2: Inc, sc in the next 3 stitches, (inc) x 3 times, sc in the next 3 stitches, (inc) x 2 times. [18]
R3: Inc, sc in the next 4 stitches, (inc, sc in the next stitch) x 3 times, sc in the next 3 stitches, (inc, sc in the next stitch) x 2 times. [24]
R4: Inc, sc in the next 7 stitches, (inc, sc in the next stitch) x 3 times, sc in the next 6 stitches, (inc, sc in the next stitch) x 2 times. [30]
R5: SC in the next 2 stitches, inc, sc in the next 6 stitches, (inc, sc in the next 2 stitches) x 3 times, sc in the next 5 stitches, (inc, sc in the next 2 stitches) x 2 times, inc. [37]
V6-10: Pb in the 37 points. [37]
R11: Sc in the next 2 points, (dec, sc in the next 3 points) repeat 7 times. [30]
R12: Sc in the next 2 points, dec, sc in the next 7 points, dec, sc in the next 4 points, dec, sc in the next 7 points, dec, sc in the next 2 points. [26]
R13: SC in the next 3 stitches, (inc, sc in the next stitch) x 4 times, sc in the next 15 stitches. [30]
R14: (Sc in the next 2 stitches, inc) repeat 6 times, sc in the next 12 stitches. [36]
R15: (Sc in the next 2 stitches, inc) repeat 6 times, sc in the next 18 stitches. [42]
R16: (Sc in the next 9 stitches, inc) repeat 4 times, sc in the next 2 stitches. [46]
V17: Pb in the 46 points. [46]
R18: (Dec, sc in the next 6 stitches) repeat 5 times, dec, sc in the next 4 stitches. [40]
R19: (Dec, sc in the next 6 stitches) repeat 5 times. [35]
R20: (Dec, sc in the next 5 stitches) repeat 5 times. [30]
Insert the safety eyes between round 13 and round 14 (3-4 stitches apart).
R21: (Dec, sc in the next 3 stitches) repeat 6 times. [24]
Place small beads inside the plastic container. Close the container and secure it with cloth tape.
Place the container with the beads inside the head and fill the head with fiberfill.
R22: (Dec, sc in the next 2 stitches) repeat 6 times. [18]
R23: (Dec, sc in next stitch) repeat 6 times. [12]
R24: (Dec) repeat 6 times. [6]
Fasten and leave a small tail. Pull the yarn tail through the front loops of the remaining 6 stitches with your hook or sewing needle and pull to close the hole. Weave the ends.
Scarf
V1: Knit 60 pc with yellow thread, turn. [60]
R2: 1 sc, sc in the next 59 stitches starting from the 2nd sc on the hook, 3 sc in the last stitch, turn and continue working on the other side of the base pc: sc in the next 59 stitches, join with a sl . Fasten and weave the ends.
Assembly
Embroider nostrils, eyebrows and a mouth.
Pin the ears to the head and sew them on.
Sew the head in the middle of the semi-ring.
Sew the arms to the ring near the head.
Put the scarf on it.