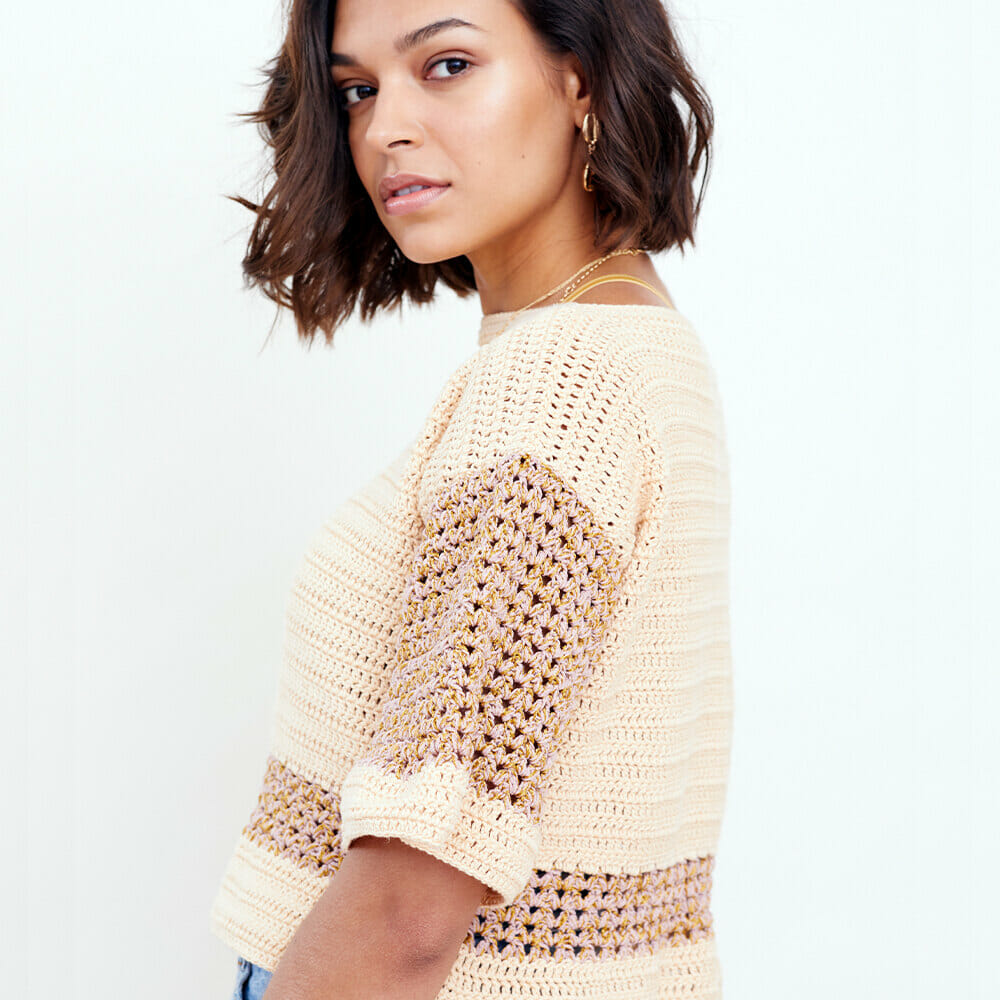
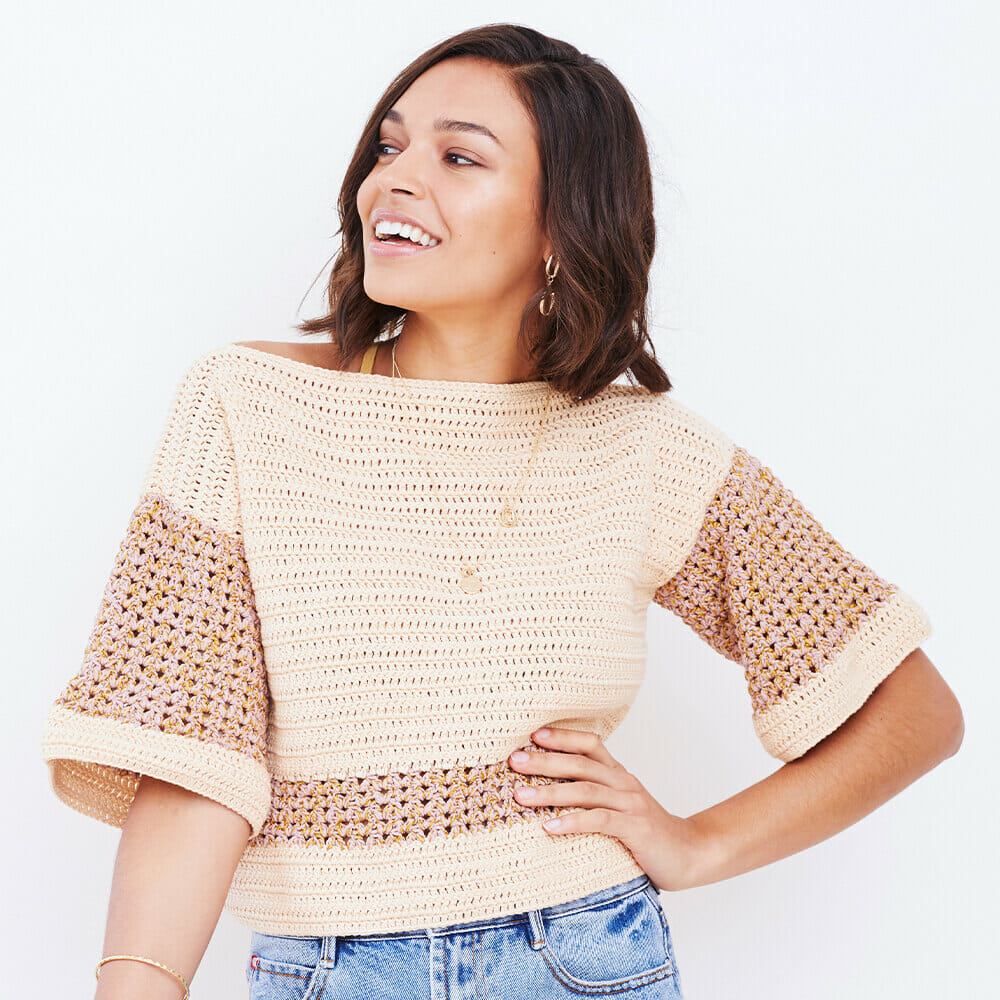
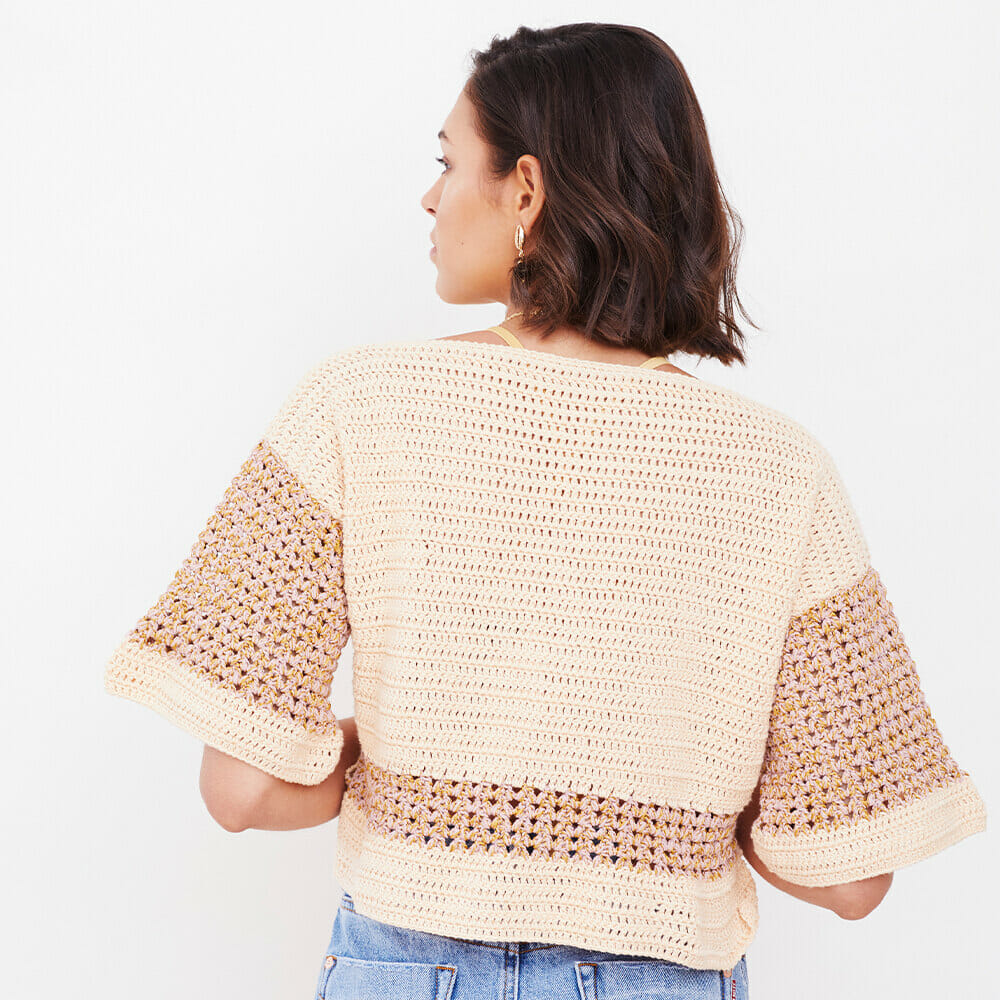
✅ Crochet tops are a beautiful and elegant way to add a touch of style and originality to any summer look . In particular, a crochet sleeve top can be the perfect garment to look comfortable and cool during hot days. In addition, it is a piece that you can easily customize in terms of size, color and pattern to suit your preferences and needs.
✅ In this article, we’ll explore different techniques for creating a crochet sleeveless top, as well as share helpful tips to make sure your project is a success . Discover how you can create your own crochet sleeve top and add a touch of style and originality to your summer wardrobe.
Abbreviations
Pc: Chain stitch.
Pb: Low point.
P: High point.
Pr: Slip stitch/Slip stitch.
Point(s): Point(s).
Fc: Forked Cluster: *(Yarn over, insert hook into first position, Yarn over, pull up one loop) twice, Yarn over, pull through 4 loops, lose 1 st, repeat from * in next position, yarn pull through all 3 loops
Tr: Double high crochet.
Materials _ _
Color A Light Caramel, 5 [5: 5: 6: 6: 6] balls.
Color B Piña Colada [5:5:6:6:6] balls.
Hook size 4mm.
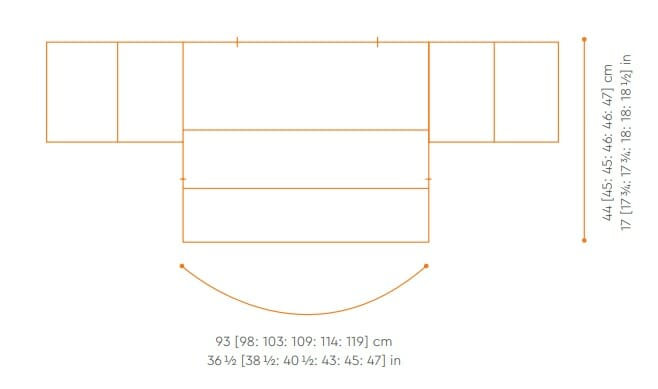
Measures
To adjust the bust
81 86 91 97 102 107 cm
actual measurement
93 98 103 109 114 119 cm
Finished length
44 45 46 46 47cm
Caliber
18 sts and 8 rows measured over 10 cm in double treble crochet.
18 sts and 10 rows measured over 10 cm forked cluster, 2 pc, pattern repeat.
Top Special Edition Terramar Crochet Instructions
Grades
It is vitally important to check the tension (gauge) before starting, since working with the wrong tension will mean that your garment does not fit the correct size and could result in
excess thread or needing more thread.
Before you begin, knit a tension swatch (gauge) of at least 5 inches, 13 cm, and measure your tension. If there are more sts and rows than indicated, try again with a thicker hook. If there are fewer sts and rows than indicated, try again with a thinner hook.
good to know
Thread quantities are based on average needs and are therefore approximate.
Color reproduction is the closest thing printing processes allow.
Repeat the figures in parentheses ( ) the number of times indicated below.
Instructions are given for the smallest size, and changes for larger sizes are given in square brackets [ ] after.
When only one figure is indicated, it refers to all sizes.
When the number 0 appears, no stitch, time or row is worked for this size.
3 PCs do not count as points.
Top
Front and back
Both the same and worked from bottom to top in rows.
With A, do 85 [91: 94: 100: 103: 109] pc’s.
Row 1 (Right side): 1 Tr (dc) in 3rd sc from hook and in each sc to end, turn. 83 [89: 92: 98: 101: 107] pts.
Row 2: 2 Pc (does not count as a st here and in the entire row), 1 tr (dc) in each st to the end, turn.
Rows 3 and 4: Like row 2.
Break A and join at B.
Row 5: 4 Sc (counts as 1 tr (dc) and 1 sc here and throughout the row), work fc over sts 2 and 4, *2 sc, 1 fc starting in the next st, repeat from * to end, 1 pc, 1 tr (dc) in last st, turn. 83 [89:92:98:101:107] sts, 27 [29:30:32:33:35] 2 tr 1fc, pattern repeat plus 2 tr (dc).
Row 6: 4 Pc, 1 fc over 1 pc and 2 pc-spaces, *2 pc, 1 fc starting in the same 2 pc-space and working in the next 2 pc-space, repeat from * ending the last fc in 4 sc, 1 sc, 1 tr (dc) in 3rd st of 4 sc, turn.
Rows 7-9: As row 5.
Break B and join at A.
Row 10: 2 Pc, 1 tr (dc) in first st, 1 tr (dc) in 1 pc-space, 1 tr (dc) on top of fc *2 tr (dc) in 2 pc-space, 1 tr ( dc) on top of fc, repeat from * to last fc, 2 tr (dc) in 4 pc, turn. 83 [89:92:98:101:107] pts.
Row 11: 2 Pc, 1 tr (dc) in each st to the end, turn.
Rows 12 -37: [38:38:39:39:40] like row 11.
Sleeve
Both are the same and are worked from the cuff to the shoulder in the round.
With A, make 84 [87: 90: 93: 96: 99] sc’s, then, being careful not to twist the sc, join with a sl st to form a ring, turn.
Row 1 (Right side): 2 Stc (does not count as a st here and throughout), 1 tr (dc) in each st to end, tr to top of first st at beginning of round, turn. 84 [87:90:93:96:99] pts.
Row 2: 2 Pc, 1 tr (dc) in each st to end, tr to top of first st at beginning of row, turn.
Rows 3 and 4: Like row 2.
Break A and join at B.
Row 5: 4 Sc (counts as 1 tr (dc) and 1 sc here and throughout the round), 1 sc over sts 2 and 4, *2 sc, 1 sc starting in the next st, repeat from * to end, 1 pc, pr to 3rd pc of 4 pc at beginning of row, turn. 84 [87:90:93:96:99] pts, 27 [28; 29:30:31:32] 2 pc, 1 fc, repeat pattern plus 1 pc and 4 initial pc.
Row 6: 4 Pc, 1 fc over 1 pc and 2 pc-spaces, *2 pc, 1 fc starting in the same 2 pc-space and working in the next 2 pc-2 spaces, repeat from * ending the last fc in 4 pc. 1 pc, pr to 3 pc from 4 pc at the beginning of the row, turn.
Rows 7-19: Like row 6.
Break b.
Mounting
Work seams wrong side facing, using A.
Shoulder seams: Place the front and back shoulders together and, working from the top outside edge inward, join 17 [19: 20: 22: 23: 25] sts on each side, leaving a 49 [51: 52] collar. : 54: 55: 57] points.
Side seams: On each side, working from top to bottom, skip the first 19 [19:20:21:22:23] rows to create the armholes, then sew the sides of the top together up to 7 rows (8 cm) from the end, leaving the remaining rows unjoined.
Sleeves: Repeat on both sides. Align the top of the sleeve with the arm hole, placing the starting stitch (where the cuffs meet) of the sleeve cuff flush with the armpit side seam. Pin with pins and sew carefully.
Finish
For the neckline: Using the 4mm hook, attach color A to the shoulder seam.
Row 1: 1 Stc (does not count as a st), 1 dc in each st around in each of the sts at the front and back of the neck, join it to the top of 1 st at the beginning of the row , spin . 98 [102: 104: 108: 110: 114] pts.
The second row is like the first.
Close point A.
Knit the ends.