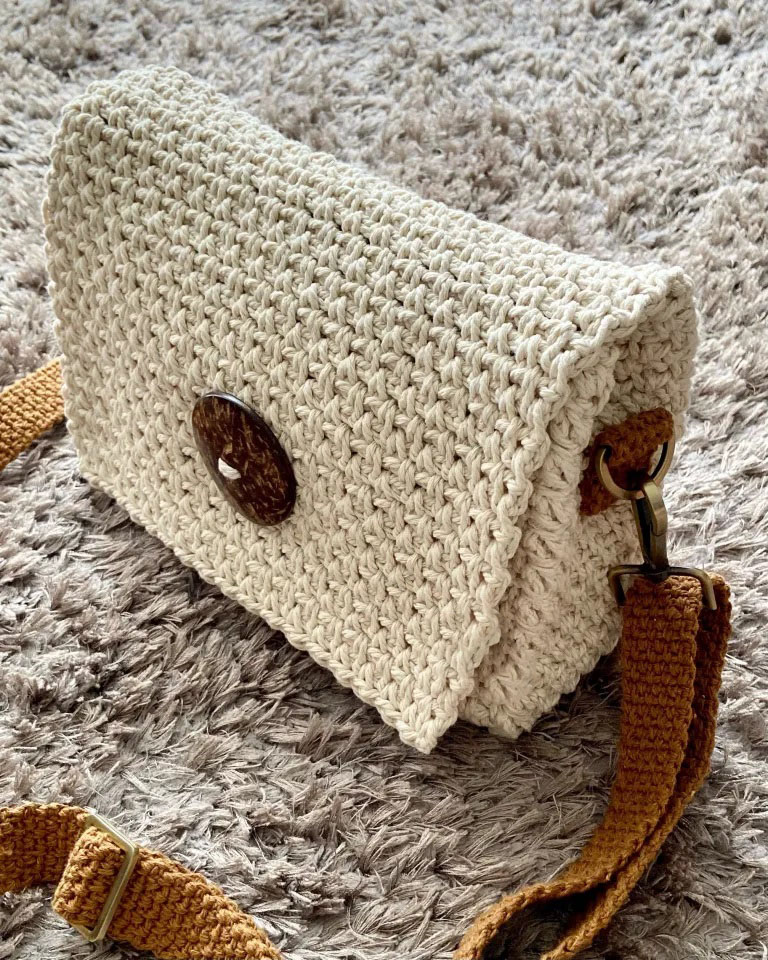
🌞 In the world of crochet, creativity and skill come together to give life to unique and functional pieces. The minimalist crochet bag is a perfect example of how hand knitting can combine the elegance of design with the versatility of a practical accessory . In this article, we will explore the beauty and functionality of this bag, which has become a symbol of style and simplicity.
🌞 The minimalist crochet bag stands out for its clean and essential design. Instead of flashy embellishments and details, it focuses on simple lines and subtle textures. This simplicity makes it a versatile piece that easily adapts to different occasions and styles.
🌞 Hand crocheting allows you to create a solid and resistant structure, while providing a light and airy appearance. The minimalist crochet bag combines soft, high-quality yarns with a carefully crafted pattern for a skin-friendly texture and exceptional durability.
🌞 The versatility of this bag is another of its outstanding features. It can be used as an elegant clutch bag to complement your outfit on special occasions, or as a practical everyday bag to carry your essential belongings . Its minimalist design turns it into a blank canvas that you can customize with accessories or combine with different styles and colors.
In addition to its attractive aesthetic, the minimalist crochet bag also offers functionality. Its ample storage space allows you to carry everything you need with you, from your wallet and keys to a bottle of water and a book . At the same time, its lightweight and comfortable design allows you to easily carry it wherever you go.
🌞 Crocheting a minimalist bag is not only a rewarding experience, but also an opportunity to express your creativity and style. You can choose the colors and size according to your personal preferences, adding details such as leather handles or magnetic closures to make it even more unique.
Abbreviations
🍂 Pc: Chain stitch.
🍂 Pb: Low point.
Materials _ _
🍂 Cotton thread, bulky weight (approximately 400gm).
🍂 Cotton lace thread, fine weight (approximately 50gm).
🍂 1 button (50mm).
🍂 5.5mm and 2.75mm hook.
🍂 2 D-rings (inner width 2.5 mm).
🍂 2 lobster hooks (inner width 2.5mm).
🍂 1 adjustable buckle (inner width 2.5 mm).
🍂 Scissors.
🍂 Tapestry needle.
🍂 Tape measure.
🍂 Sewing machines (optional).
Measures
🍂 The finished bag measures approximately 23cm wide x 16cm high x 7cm deep.
Caliber
🍂 17 stitches x 14 rows = 10cm.
Instructions
Pattern Stitch (Linen/Moss Stitch)
The bag and strap assembly are knitted with linen/moss stitch as indicated below.
Start with the even number of pattern stitches + 2 additional stitches.
Row 1: Sc in 4th sc from hook, *sc 1, skip 1, sc in next* repeat* to end.
Row 2: Pc 2, turn. *Sc in sc space 1, sc 1*, repeat * and finish to the last sc space 1 with sc.
Repeat row 2 for the rest of the pattern.
Back and top (A)
38 stitches x 48 rows in linen/moss stitch.
Start with 40 pc.
Row 1: Sc in 4th sc from hook, (sc 1, skip 1, sc) x 18.
Row 2: Sc 2, turn, sc in sc space 1, (sc 1, sc in sc space 1) x 18.
Rows 3-40: Repeat row 2.
Row 41 (wrong side): Sc 2, turn, (sc in sc space 1, sc 1) x 8, [sc 6] – buttonhole, sc 1, (sc 1, sc in sc space 1) x 7.
Row 42 (right side): Sc 2, turn, (sc in the space of sc 1, sc 1) x 7, [sc, sc 1, sc, sc 1, sc] – buttonhole, (sc 1, sc in the 1) x 8 pc space.
Row 43: Sc 2, turn, sc in sc space 1, (sc 1, sc in sc space 1) x 17.
Row 44-48: Repeat row 43.
Note: It was reduced when creating the eyelet to give a slightly smaller shape to the edge of the bag lid.
Front (B)
38 stitches x 22 rows of linen/moss stitch.
Start with 40 pc.
Row 1: Sc in 4th sc from hook, (sc 1, skip 1, sc) x 18.
Row 2: Sc 2 turns, sc in sc 1 space, (sc 1, sc in sc 1 space) x 18.
Rows 3-22: Repeat row 2.
Bottom and sides (C)
12 stitches x 74 rows in linen/moss stitch.
Start with 14 pc.
Row 1: Sc in 4th sc from hook, (sc 1, skip 1, sc) x 5.
Row 2: Sc 2, turn, sc in sc space 1, (sc 1, sc in sc space 1) x 5.
Turn the piece down, start again on the wrong side. Create the two sides with the same finishes.
Rows 1-52: Sc 2, turn, sc in sc space 1, (sc 1, sc in sc space 1) x 5.
Interior compartment (D)
38 stitches x 15 rows of linen/moss stitch.
Start with 40 pc.
Row 1: Sc in 4th sc from hook, (sc 1, skip 1, sc) x 18.
Row 2: Sc 2, turn, sc in sc space 1, (sc 1, sc in sc space 1) x 18.
Rows 3-15: Repeat row 2.
Assembly
Once all the rectangular pieces A, B, C and D are completed, we are going to join them with beaten seam.
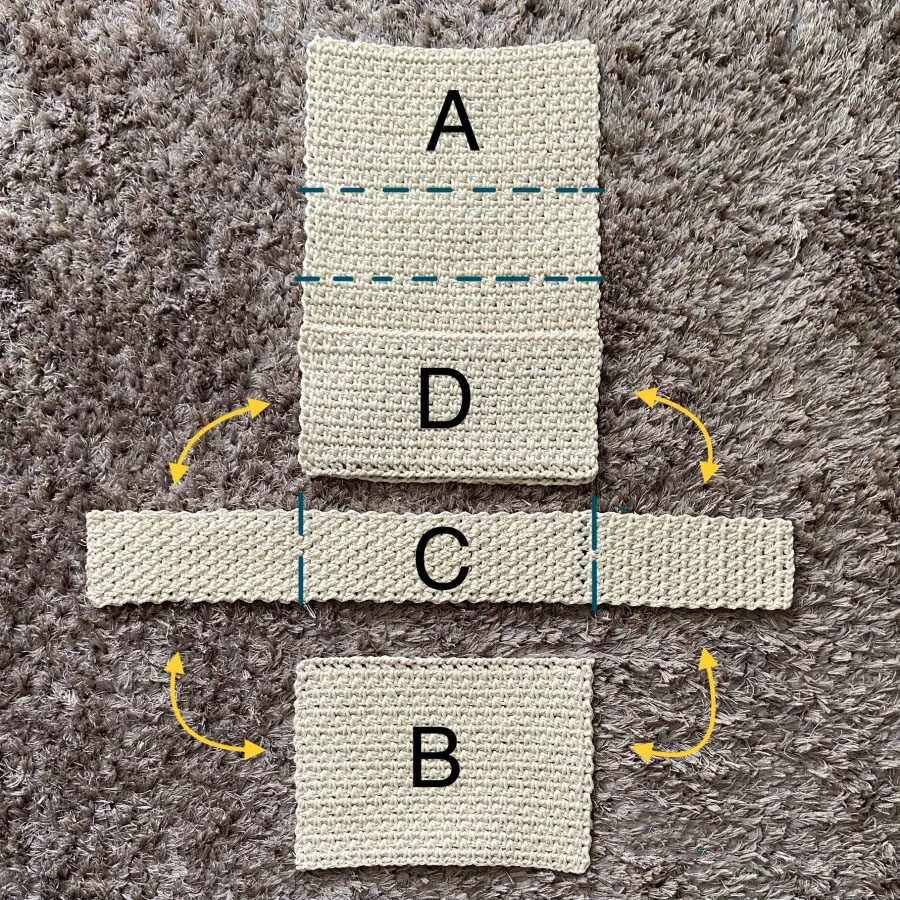
Follow the image to see the edges that need to be sewn.
Place pieces A (wrong side), D (right side) and C (right side) as indicated in the image above and sew all the pieces together.
Sew the side edge, bottom and other side. Use a dot marker to help with positioning.
Bring B and sew with the same method.
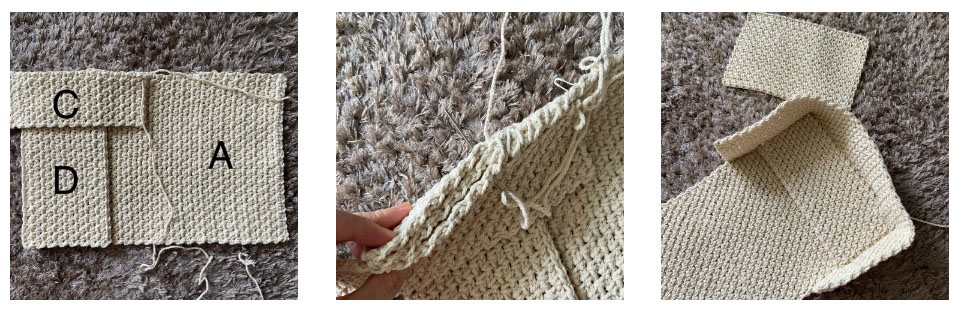
Sew a button into the buttonhole position of rectangle B.
Belt
Next, knit the strap. If you prefer to skip this step, you can also use a ready-made strap.
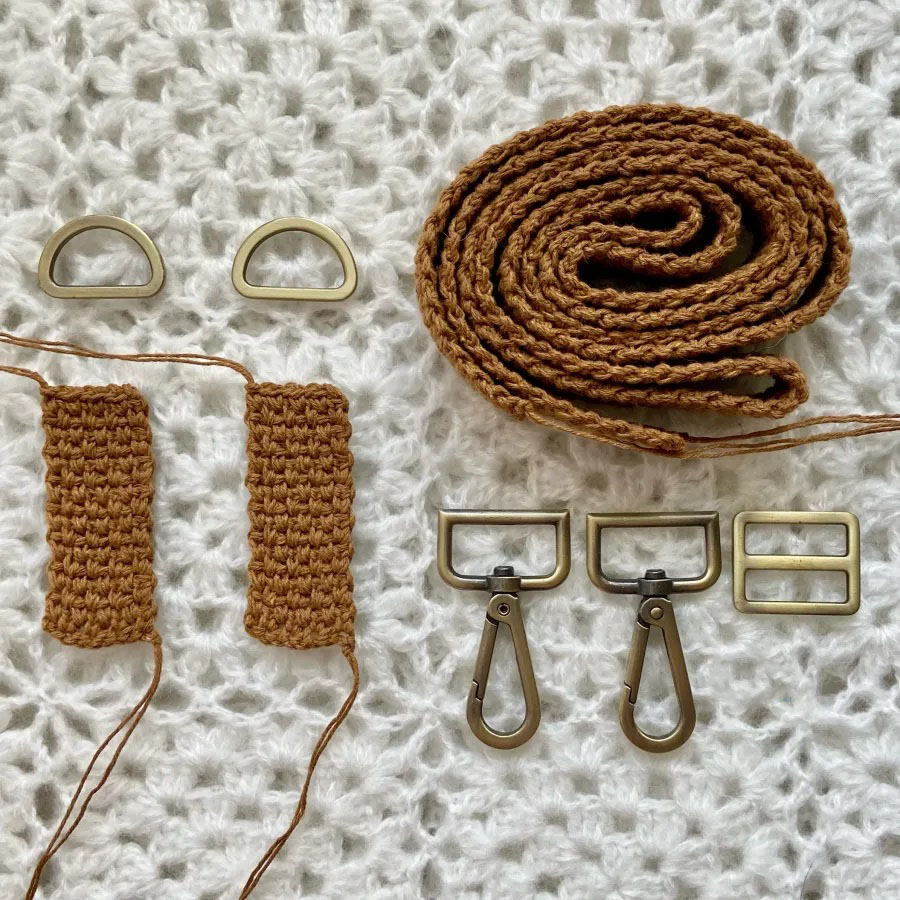
With 2 strands of lace thread tied together, weave 2 rectangles to attach to the D rings.
8 stitches x 16 rows of linen/moss.
And a 130 cm long strap.
8 stitches x 130 cm long in linen/moss stitch.
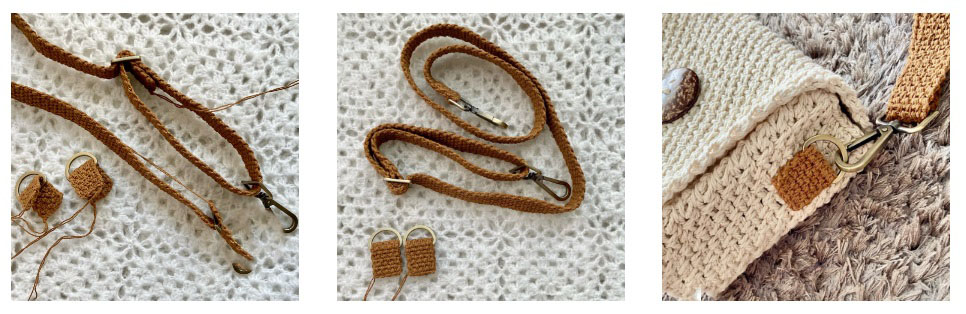
Place the 2 small rectangles on the D ring, fold them in half and sew them together. Insert the long strap into the adjustable buckle and a lobster clasp from one end of the strap, bring the end under the adjustable buckle as shown in the picture.
Sew them all in place. Don’t forget the other lobster hook to attach the other end of the strap.
Now sew the D rings to both sides of the bag and the strap is ready to attach to the D rings.