MATERIALS
For the Poncho:
- Main Color (CP) (Orange): 2 (XS/XL) – 2 (2XL/5XL) balls
- Contrast A (Yellow): 1 ball
- Contrast B (Aqua): 1 ball
For the Bag:
- Main Color (CP) (Orange): 1 ball
- Contrast A (Yellow): 1 ball
- Contrast B (Aqua): 1 ball
- 5mm crochet hook (US H or 8) or the size needed to get the sample.
- Pair of Handles 6 inches [15 cm] wide
- ½ yard [0.5 m] of lining fabric for the Bag.
SIZES
Poncho:
- Extra-Small/Extra-Large: 28 – 42 inches [71 – 106.5 cm]
- 2 Extra-Large/5 Extra-Large: 44 – 62 inches [112 – 157.5 cm]
Bag:
- Approximately: 11½ inches [29 cm] wide and 12 inches [30.5 cm] high (excluding handles).
SAMPLE
- 14 double crochets and 7 rows = 4 inches [10 cm].
- One motif = approximately 4 inches [10 cm].
ABBREVIATIONS
- Chain (ch): Basic crochet stitch to start most projects.
- Slip stitch (p.sl.): To join parts or advance the work without height.
- Low point (sc.): Provides a dense and firm fabric.
- Half double crochet (hc): Higher than the sc but shorter than the dc.
- High point (pa.): Creates fabrics with height and less density than pb or pma.
- Double decreased high crochet (pa2j or pa2tog): Technique of decreasing two dc in one.
INSTRUCTIONS
Reason I
- With the CP, chain 5. Join with swipe to form a ring.
- 1st round: 1 ch. 12 sc in the ring. Join with swipe to the first sc. Cut the CP.
- 2nd round: Join A with slip st. at any bp. *Make 7 ch. 1 sc in 2nd ch. from the hook. 1 hdc in next ch. 1 dc in each of the next 2 ch. 1 hdc in each of the last 2 chains. P.desl. in each of the next 2 sc. Repeat from * 4 more times, then from * to * once. P.desl. in the last sc. Top off.
Reason II
- Work as Motif I substituting B for A.
Poncho
The instructions are written for the smallest size.
With this structure, each section is clearly defined and the instructions are presented in a logical order that the knitter can follow step by step.
Adjustments for Larger Sizes
If you need to make alterations for a larger size, follow the instructions, adjusting the number of motifs or the number of stitches as necessary to achieve the measurements specified for the larger sizes.
First Strip (Daisies)
- Start with Reason I following the previous instructions.
- Continue with Motive II , joining it to Motive I as follows:
Union of Reasons
- 2nd round of Motif II: Join B with slip st. to any bp of Reason I.
- Make 7 ch.
- 1 sc in 2nd ch. from the hook.
- 1 hdc in next ch.
- 1 dc in each of the next 2 ch.
- 1 hdc in each of the last 2 ch.
- P.desl. in each of the next 2 sc.
- Repeat from * two more times.
- Work 7 ch, then slip st. in the peak of the adjacent petal of Motif I.
- Continue with 1 sc, 1 hdc, 2 dc, 1 hdc, and finish with slip st. in the next 2 sc.
- Repeat from * twice.
- Repeat from * at the beginning one more time.
- Join with swipe to the last sc. Top off.
- Repeat the creation and union of Motifs I and II until you have 14 (16) Motifs in total.
- Join the last Motif II to the first Motif I to form a ring.
Second Strip
- 1st round: With the right side facing forward, join CP with slip st. in the peak of the upper petal of Motif A in the First Strip.
- Make 12 ch.
- P.desl. at the peak of the upper petal of the next Motif.
- Repeat from * around, ending with ch 12.
- Join with swipe to the first slide
- 2nd round: Make 3 ch. (counts as 1 dc).
- 1 dc in each of the next 12 ch.
- 1 dc in next slip st.
- Repeat from * around, ending with p.desl. at the top of the 3 ch.
- You will have 182 (208) pa.
- 3rd round: Make 3 ch. (counts as 1 dc).
- *Pa2j (pa2tog) in the next pa.
- 1 dc in each of the next 5 (6) dc.
- Repeat from * to the last 6 (7) dc.
- Pa2j (pa2tog).
- 1 dc in each of the last 4 (5) dc.
- Join with swipe at the top of the 3 ch. Top off.
- You will have 156 (182) dc.
Third Strip (Daisies)
- Make Motif I , joining the tip of the petal with sliding p. to the joining space at the end of the 3rd round of the Second Strip.
- *Make Motif II , joining 2 side petals to Motif I as before.
- Then, skip the next 12 dc of the Second Strip.
- Join the tip of the lower petal with sliding p. to the next step.*
- Repeat from * to * alternating Motifs I and II until you have 12 (14) Motives in total.
- Join the last Motif II to the first Motif I to form a ring.
Fourth Strip (Top Edge)
- 1st round: With the right side facing forward, join CP with slip st. in the peak of the upper petal of the first Motif I in the Third Strip.
- *Make 10 ch.
- P.desl. at the peak of the upper petal of the next Motif.
- Repeat from * around, ending with ch 10.
- Join with swipe to the first slide
- 2nd round: Make 3 ch. (counts as 1 dc).
- *1 dc in each of the next 10 ch.
- 1 dc in next slip st.
- Repeat from * around, ending with p.desl. at the top of the 3 ch.
- You will have 132 (154) dc.
- 3rd round: Make 3 ch. (counts as 1 dc).
- *Pa2j (pa2tog).
- 1 dc in each of the next 2 (1) dc.
- Repeat from * to the last 3 (0) dc.
- Pa2j (pa2tog) 1 (0) time.
- 1 dc in each of the last 1 (0) dc.
- Join with swipe at the top of the 3 ch. Top off.
- You will have 99 (103) dc.
Bottom edge
- 1st round: With the right side facing forward, join CP with slip st. in the peak of the lower petal of the first Motif I in the First Strip.
- *Make 12 ch.
- P.desl. at the peak of the lower petal of the next Motif.
- Repeat from * around, ending with ch 12.
- Join with swipe to the first slide
- 2nd round: Make 3 ch. (counts as 1 dc).
- *1 dc in each of the next 12 ch.
- 1 dc in next slip st.
- Repeat from * around, ending with p.desl. at the top of the 3 ch.
- You will have 182 (208) pa.
- 3rd round: Make 3 ch. (counts as 1 dc).
- 1 dc in each dc around.
- Join with swipe at the top of the 3 ch. Top off.
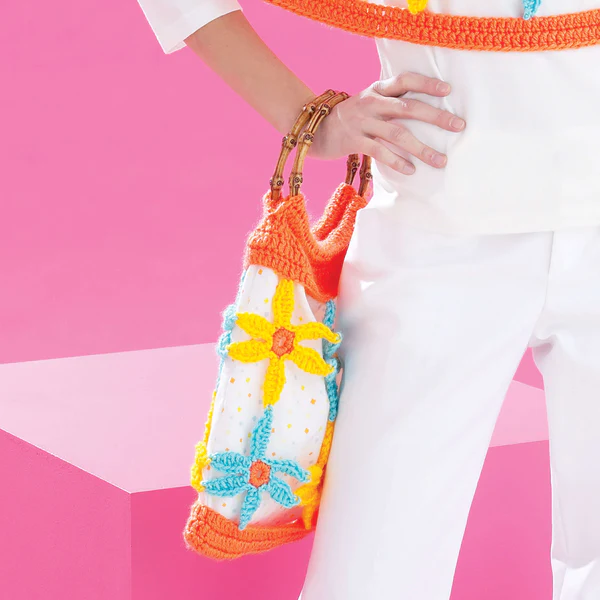
INSTRUCTIONS FOR THE BAG
First Strip (Daisies)
- Perform Reason I following the previous instructions.
- Continue with Motif II , joining it to Motive I as follows on the 2nd round :
- Join B with slip p. to any bp of Reason I.
- *Make 7 ch.
- 1 sc in 2nd ch. from the hook.
- 1 hdc in next ch.
- 1 dc in each of the next 2 ch.
- 1 hdc in each of the last 2 ch.
- P.desl. in each of the next 2 sc.*
- Repeat from * two more times.
- Work 7 ch, then slip st. in the peak of the adjacent petal of Motif I.
- Continue with 1 sc, 1 hdc, 2 dc, 1 hdc, and finish with slip st. in the next 2 sc.
- Repeat from * at the beginning one more time.
- Join with swipe to the last sc. Top off.
- Continue working Motifs I and II , joining them as indicated until you have 6 Motifs in total.
- Join the last Motif II to the first Motif I to form a ring.
Second Strip (Daisies)
- Work as in the First Strip , starting with Motif B.
- Join the tips of the lower petals to the tips of the upper petals of the First Strip .
Bottom edge
- 1st round: With the right side facing forward, join CP with slip st. in the peak of the lower petal of the first Motif I in the First Strip .
- *Make 14 ch.
- P.desl. at the peak of the lower petal of the next Motif.
- Repeat from * around, ending with ch 14.
- Join with swipe to the first slide
- 2nd round: Make 3 ch. (counts as 1 dc).
- *1 dc in each of the next 14 ch.
- 1 dc in next slip st.
- Repeat from * around, ending with p.desl. at the top of the 3 ch.
- You will have 90 pa.
- 3rd and 4th rounds: Make 3 ch. (counts as 1 dc).
- 1 dc in each dc around.
- Join with swipe at the top of the 3 ch. Top off.
- Place right sides together along the bottom edge and work 1 row of sc through both thicknesses of the last round to join the bottom seam.
Top Edge
- 1st round: With the right side facing forward, join CP with slip st. in the peak of the upper petal of the first Motif II in the First Strip .
- *Make 12 ch.
- P.desl. at the peak of the lower petal of the next Motif.
- Repeat from * around, ending with ch 12.
- Join with swipe to the first slide
- 2nd round: Make 3 ch. (counts as 1 dc).
- *1 dc in each of the next 12 ch.
- 1 dc in next slip st.
- Repeat from * around, ending with p.desl. at the top of the 3 ch.
- You will have 78 pa.
- 3rd round: Make 3 ch. (counts as 1 dc).
- *Pa2j (pa2tog).
- 1 dc in each of the next 11 dc.
- Repeat from * until the end of the round.
- Join with swipe at the top of the 3 ch.
- You will have 72 pa. Top off.
Division for the Handles
- Next row: With the right side facing forward, join CP with slip st. to the 5th point before the slip st. union of the last round.
- Make 3 ch. (counts as 1 dc).
- 1 dc in each of the next 35 stitches. Spin.
- Next row: Make 3 ch. (counts as 1 dc).
- 1 dc in each dc across.
- Repeat the last row one more time. Top off.
- With the right side facing forward, join CP with slip st. to the next stitch and work 3 rows as on the first side.
FINISH
- Cut the lining fabric to 13 x 24 inches [33 x 61 cm].
- With wrong sides together, sew the side seams using French seams, so that the finished seams are on the wrong side of the lining.
- Fold the top hem to the wrong side and sew into position.
And that’s it! 🌟 We hope you enjoyed knitting this Crochet Flower Chain Bag and Poncho, as much as we enjoyed sharing it with you. If you loved this pattern, don’t forget to subscribe to receive more wonderful creations. 💌 Share your results with us and the community; We would love to see how your dolls turned out! 🧶💕 Don’t hesitate to leave your comments, questions or suggestions; Your feedback is always welcome and helps us improve. Until the next pattern! 👋🎉