
The pieces are worked in a continuous spiral from a magic ring, unless otherwise specified. Mark the first stitch of each row with a removable stitch marker.
Make sure the stitches are tight enough to prevent padding from showing through, adjust the hook size if necessary.
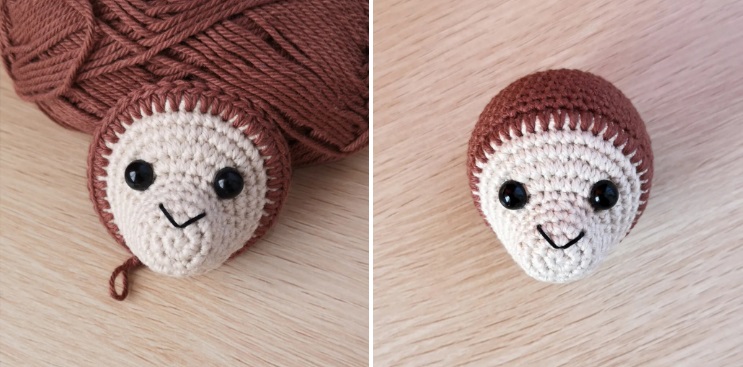
Head (beige starts)
R1: 6 sc in magic ring (6).
V2: [Inc] x6 (12).
R3: [Sc, inc] x6 (18).
V4-5: [Sc] x18 (18).
Round 6: sc, inc, [2 sc, inc], sc (24)
R7: 9 sc, [inc] x6, 9 sc (30)
Round 8: 9 sc, [sc, inc] x6, 9 sc (36)
V9: [Pb] x36 (36)
R10: [5 sc, inc] x6 (42)
R11: [Sc] x42 (42) – change to brown at the last stitch.
V12: [SPsc] x42 working on V10 (42). Insert the eyes between V7 and V8, on the first and last inc.
With 2 strands of embroidery thread, embroider the nose. Start just above the magic circle and sew a wide V over 2 rows.
V13-19: [Pb] x42 (42).
V20: [5 sc, invdec] x6 (36).
R21: 2 sc, invdec, [4 sc, invdec] x5, 2 sc (30). Start refilling and continue refilling as you go.
R22: [3 sc, invdec] x6 (24).
R23: sc, invdec, [2 sc, invdec] x5, sc (18).
V24: [Pb, invdec] x6 (12).
V25: [Invdec] x6 (6). Fasten and knit the end.
Body (brown)
R1: 6 sc in magic ring (6).
V2: [Inc] x6 (12).
R3: [Sc, inc] x6 (18).
R4: sc, inc, [2 sc, inc] x5, sc (24).
R5: [3 sc, inc] x6 (30).
V6-9: [Pb] x30 (30).
R10: [3 sc, inc] x6 (24).
R11-12: [Pb] x24 (24).
R13: sc, invdec, [2 sc, invdec] x5, sc (18).
R14: [Sc] x18 (18). Fasten, leaving a long tail for sewing. Fill.
Arms (make 2, start with beige)
V1: 6 sc in magic ring (6).
R2: [Inc, sc] x3 (9).
V3-4: [Sc] x9 (9).
R5: [Invdec, sc] x3 (6) – turns brown at the last stitch.
V6-11: [Pb] x6 (6). Flatten and sc through (2) – do not fill. Fasten, leaving a long tail for sewing.
Legs (make 2, start with beige)
R1: 4 sc, sc in 2nd sc from hook, sc in next ch, 3 sc in last ch.
Working on opposite side of ch, sc, inc on last ch (8).
R2: 2 sc, [inc] x3, 3 sc (11).
R3: 2 sc, [invdec] x3, 3 sc (8).
R4: 2 sc, [invdec] x2, 2 sc (6) – change to brown at the last stitch.
Lightly fill in the tip.
V5-7: [Pb] x6 (6)
Rnd 8: 1 sc, flatten and sc through (2) – do not fill in the rest of the leg.
Fasten, leaving a long tail for sewing.
Ears (make 2 with beige)
R1: 6 sc in magic ring (6).
R2: Pc 1, turn. [sc, inc] x3 (9).
Button and weave the ends.
Make 2 with brown
R1: 6 sc in magic ring (6).
R2: Pc 1, turn. [sc, inc] x3 (9).
R3: Pc 1, turn. Place the beige piece against the brown piece with the correct side facing you and sc in each stitch on both pieces to join together (9)
Fasten, leaving a long tail for sewing.
Repeat for the 2nd ear.
Line
R1: 6 sc in the magic ring (6).
V2-21: [Pb] x6 (6).
Fasten, leaving a long tail for sewing.
Take your floral wire and bend the end over so there is no sharp point poking through the tail end. Insert the wire into the tail and trim with about 1/2″ sticking out from the bottom. Fold the tail as desired. This can always be adjusted later once you’ve joined.
Note: It was decided not to fill the tail because the piece shown is very small. If you use a thicker thread, you can stuff it slightly.
Flower (starts yellow)
R1: 5 sc in magic ring. Change to white in last sc and sr to first sc to join.
R2: ch 2 (counts as 1st dc), 3 dc in the same stitch and complete a check stitch as normal. Popcorn stitch in each stitch around. Pr in the back of the initial 2 pc to join (5 popcorn stitch petals).
Fasten, leaving a long tail for sewing.
assembly
Sew the head to the body. The front part of the body should be placed on V12 of the head.
Sew the arms on both sides of the body in V14.
Sew the legs to both sides of the body in a sitting position. The back of the paw should be in line with the back of the arm.
Sew the ears on both sides of the head between R13 and R14. Place the top of the ear slightly higher than the eyes.
Insert the wire sticking out of the tail into the back of the body. Make sure the amigurumi lays flat. Sew it to the body and fold it to adjust as needed so that the base of the tail provides support so it can sit up on its own.
Sew the flower to the side of the head above V12.