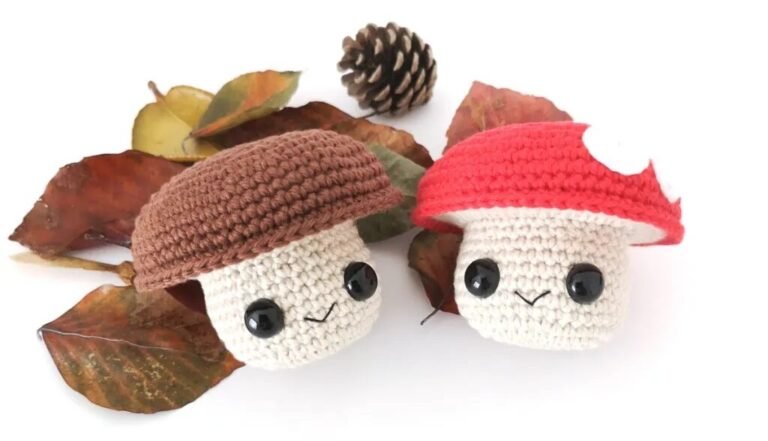
Customize this wonderful Amigurumi Friendly Mushroom Crochet project to the fullest, with the colors and size you want. Without a doubt, an adorable and tender hand-knitted project that will become your favorite for a long time.
Abbreviations
- Pc: String
- Pb: Low Point
- Increase: Increase
- Invdec: Invisible Decrease
- P: High Point
- FLO: Front Loop
- Pa-aum: High Point Increase
- Pr: Sliding Point
- […] = Repeat the instructions
- (…) = Indicates the number of stitches at the end of the round
Materials
- DK weight yarn in beige, red/brown and white.
- 2.5mm crochet hook.
- 10mm safety eyes.
- Polyester fiber filling.
- Black thread for embroidery.
- Point marker.
- Thread needle.
- Scissors.
Measures
- The amigurumi measures approximately 3″ x 2.25″ (8 cm x 6 cm).
Caliber
- Gauge is not important in this pattern. Use a hook size that corresponds to the chosen yarn.
- Make sure the stitches are tight enough on your amigurumi to prevent the stuffing from showing through, adjust the hook size if necessary.
Instructions for the Amigurumi Friendly Crochet Mushroom
- Pieces are worked in a continuous spiral starting with a magic ring, unless otherwise specified. Mark the first stitch of each round with a removable stitch marker.
Body (use beige color)
- Round 1: 6 sc in a magic ring (6).
- Round 2: [Inc] x6 (12).
- Round 3: [Sc, inc] x6 (18)
- Round 4: Sc, inc, [2 sc, inc] x5, sc (24).
- Round 5: [3 sc, inc] x6 (30).
- Round 6: 2 sc, inc, [4 sc, inc] x5, 2 sc (36).
- Round 7: FLO [sc] x36 (36).
- Rounds 8-12: [Pb] x36 (36).
- Round 13: 2 sc, invdec, [4 sc, invdec] x5, 2 sc (30).
- Round 14: [Pb] x30 (30).
- Row 15: Pr in the next stitch, make 2 sc, FLO dc-inc in the same stitch and in each stitch
- around (60).
- Fasten invisibly and knit at the end. Insert the safety eyes between round 9 and round 10, 6 stitches apart.
Hat (use red or brown)
- Round 1: 6 sc in a magic ring (6).
- Round 2: [Inc] x6 (12).
- Round 3: [Sc, inc] x6 (18).
- Round 4: Sc, inc, [2 sc, inc] x5, sc (24).
- Round 5: [3 sc, inc] x6 (30).
- Round 6: 2 sc, inc, [4 sc, inc] x5, 2 sc (36).
- Round 7: [5 sc, inc] x6 (42).
- Round 8: 3 sc, inc, [6 sc, inc] x5, 3 sc (48).
- Round 9: [7 sc, inc] x6 (54).
- Round 10: 4 sc, inc, [8 sc, inc] x5, 4 sc (60).
- Rounds 11-13: [Pb] x60 (60).
- Do not fasten, as the hat must be knit to the body.
Note: There will be a noticeable size difference between the stem and the cap. This will be solved as long as both pieces have the same number of points.
Spots (optional, make as many as you want)
Medium (use white)
- Round 1: 6 sc in a magic ring (6).
- Round 2: [Inc] x6 (6).
- Fastens invisibly, leaving a long tail to sew.
Small (use white)
- Round 1: 6 sc in a magic ring (6).
- Fastens invisibly, leaving a long tail to sew.
Assembly
- Firmly fills the body. Starting at the back of the body, attach the hat to the body by weaving through the two hat loops and the front body loop.
- [Pb] x60 (60) – lightly fill the hat before closing it completely. Fasten invisibly and knit the end.
- Sew the spots to the hat, placing them in any order you want.
- Use a single strand of embroidery floss to sew a small mouth.