Materials
✅ Light Peach – 1 ovillo.
✅ White – 1 ball.
✅ Black – 1 ovillo.
✅ Chocolate – 1 ball.
✅ Gray Melange – 1 ball.
✅ Sunflower – 1 ball.
✅ Gancho of 3.75 mm.
✅ Sharp to work.
✅ A pair of 12 mm (0.5) safety eyes.
✅ Filled with polyester fiber.
✅ Amigurumi brush (or a pet brush) to brush the hair.
✅ Craft glue/fabric to glue the “M” on the chest (or yellow sewing thread and a sewing needle if you want to sew it).
✅ Blush and a makeup brush to give color to the cheeks.
Measurements
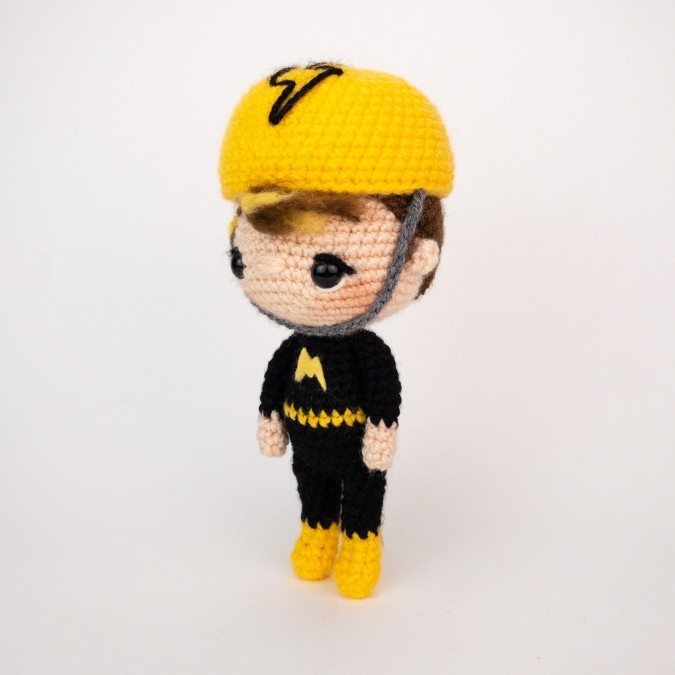
✅ One size. ✅ The final measure of the finished amigurumi is 22 cm high.
Tips
✅ This pattern is knitted in continuous rounds (each round is not joined).
✅ Start each circle with “2 ch, 6 sc in the first ch”. Another way to start is with a magic circle. If you are more familiar with this method, simply do 6 sc in your magic circle.
✅ Explanation of decrease with a single crochet: Insert the hook in the next stitch and make a loop. Pull out one loop so that there are 2 loops on the hook. Insert the hook into the next stitch and make a yarn over. Pull out one loop so that there are 3 loops on the hook. Yarn over again and thread through the 3 loops on the hook.
✅ To change color on the round, always change at the end of the previous point. For example, when changing to black from yellow, you will change to black in the last yarn over from the last stitch.
So when you have 2 loops of the old color on the hook, pull the new color through the 2 loops to change it up, and then continue working with the new color. For a sharper color change, make the first stitch with the new color as a slip stitch instead of a single crochet.
Instructions
Head
✅ Use the Light Peach color thread.
✅ V1: 2 cad, 6 bp en el primer p. (6 pts)
✅ V2: 2 sc in each st around. (12 points)
✅ V3: (1 sc, 2 sc in the next st), 6 times. (18 points)
✅ V4: (2 sc, 2 sc in the next st), 6 times. (24 points)
✅ R5: (3 sc, 2 sc in the next st), 6 times. (30 points)
✅ V6: (4 sc, 2 sc in the next st), 6 times. (36 points)
✅ V7: (5 sc, 2 sc in the next st), 6 times. (42 points)
✅ V8-13: 42 sc. (42 sts x 6 rows in total)
✅ R14: (6 sc, 2 sc in the next st), 6 times. (48 points)
✅ V15-16: 48 sc. (48 sts x 2 rows in total)
✅ R17: (7 sc, 2 sc in the next st), 6 times. (54 points)
✅ V18: (7 pb, 1 dism), 6 veces. (48 pts)
✅ V19: (6 pb, 1 dism), 6 veces. (42 pts)
✅ V20: (5 pb, 1 dism), 6 veces. (36 pts)
✅ V21: (4 pb, 1 dism), 6 veces. (30 pts)
✅ V22: (3 pb, 1 dism), 6 veces. (24 pts)
✅ V23: (2 pb, 1 dism), 6 veces. (18 pts)
✅ V24: (1 pb, 1 dism), 6 veces. (12 pts)
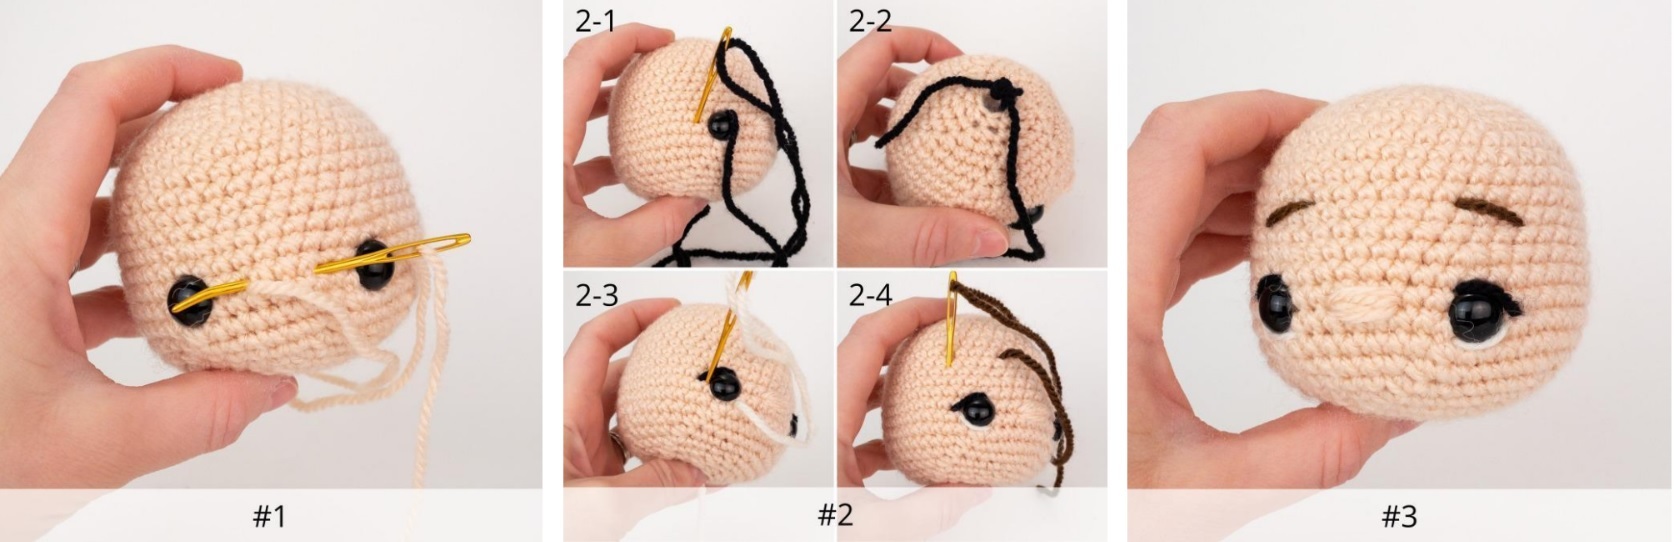
✅ Top off leaving the end to sew. She begins to stuff the head. Next, he inserts the safety eyes between the V16-R17 with 7 points between them. He squeezes tightly by closing his eyes.
✅ Use the strand of yarn left from the head to sew a nose between the eyes – the nose should be 4-5 stitches and 3 stitches wide perfectly centered between the eyes (Photo 1). Weave the strand of yarn into the head and secure with an inside knot.
✅ Now hook a long strand of black thread onto your needle, insert it through the opening at the bottom of the head, and pull it out just above the eye. Sew 1 long stitch just above each eye, as shown in photo 2-1. Then, weave the black strand into the head and secure it with a knot at the beginning end of the strand (Photo 2-2).
✅ Now hook a strand of white thread onto your needle, insert it through the opening at the bottom of the head and pull it out just below the eye. Sew 1 white stitch under each eye (Photo 2-3). Secure this white strand to the beginning end as you did with the black strand.
✅ For the eyebrows, hook a strand of dark brown thread onto your needle, insert it through the opening at the bottom of the head, and pull it out 3 times above the top of the eyes. Sew an eyebrow 3 stitches wide and at a slight angle above each eye (Photo 2-4 and Photo 3). Secure this brown strand as you did with the black and white strands.
✅ Now finish firmly filling the head.
Ears (make 2)
✅ Use the Light Peach color yarn,
✅ V1: 2 cad, 4 pb en el primer p. (4 pts)
✅ Top off leaving the end to sew. Sew the ears on each side 5 stitches behind the eyes; the top of the ears should be 1 turn above the top of the eyes (Photo 4).
For the
✅ Use the Chocolate color thread.
✅ V1: 2 cad, 6 bp en el primer p. (6 pts)
✅ V2: 2 sc in each st around. (12 points)
✅ V3: (1 sc, 2 sc in the next st), 6 times. (18 points)
✅ V4: (2 sc, 2 sc in the next st), 6 times. (24 points)
✅ R5: (3 sc, 2 sc in the next st), 6 times. (30 points)
✅ V6: (4 sc, 2 sc in the next st), 6 times. (36 points)
✅ V7: (5 sc, 2 sc in the next st), 6 times. (42 points)
✅ R8: (6 sc, 2 sc in the next st), 6 times. (48 points)
✅ V9-17: 48 sc. (48 sts x 9 rows in total)
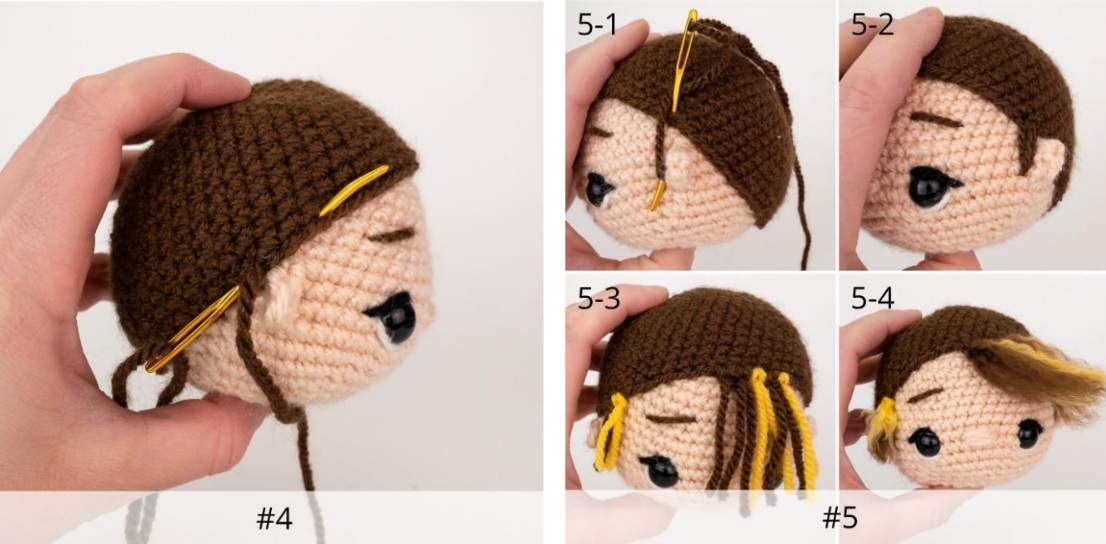
✅ Top off leaving the long end to sew. Place the hair on top of the head, so that it fits behind the ears on both sides; Also, the front of the hair should start 8 turns from the top of the nose.
Sew the hair to the head, sewing from above to hide the stitches – insert the needle behind the front of one stitch in the hair, on the head, then back up a few stitches above (Photo 4). Sew all the way around as many times as necessary until the cape is secure.
Now, use the remaining brown yarn to sew 3 sts in front of each of the doll’s ears as sideburns (Photos 5-1 and 5-2).
✅ Next, cut 4 short strands of Chocolate yarn and 3 short strands of Sunflower yarn. Fix 3 or 4 brown and 2 yellow strands to the left/center of the hair layer (Photo 5-3). Then, join the leftover brown strand and yellow strand in front of the ear on the left side of the fur layer.
Trim the center threads to about 5 cm, and the 2 left threads to about 2.5 cm. Next, use the amigurumi brush to brush them until they are frayed (Photo 5-4). Trim the ends as needed to get the desired look.
Legs (make 2)
✅ Use the Sunflower color thread.
✅ V1: 2 cad, 6 bp en el primer p. (6 pts)
✅ V2: (1 sc, 2 sc in the next st), 3 times. (9 points)
✅ V3: 9 pb. (9 points)
✅ V4: 2 pb, 2 dism, 3 pb. (7 pts)
✅ V5: 7 pb. (7 pts)
✅ V6: 2 sc in the first st, 6 sc. (8 points)
✅ Switch to Black thread.
✅ V7-8: 8 bp. (8 pts x 2 rounds in total)
✅ V9: 2 bp in el primer p, 7 bp. (9 pts)
✅ V10: 9 pb. (9 pts)
✅ V11: 2 bp in el primer p, 8 bp. (10 points)
✅ V12: 10 pb. (10 pts)
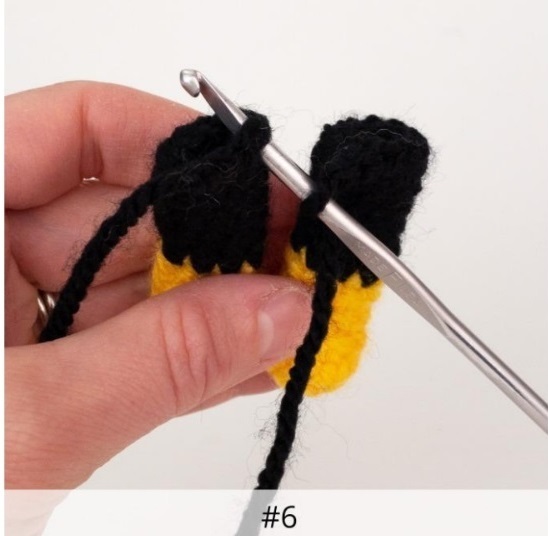
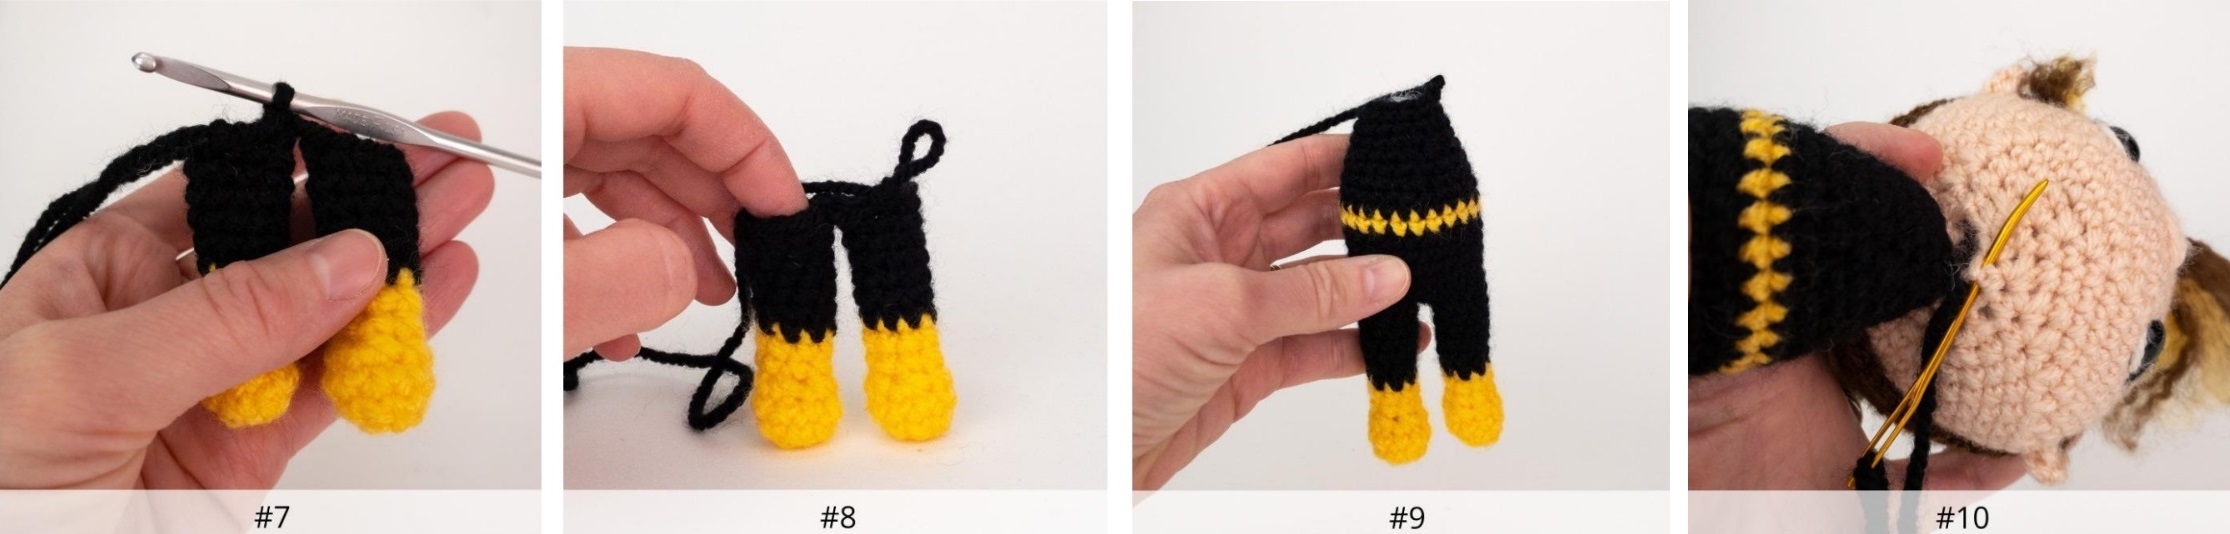
✅ For the first leg, finish off here leaving a thread tail to sew. Once you’ve made the second leg, don’t finish it off. Instead, single crochet 2 so that you are at the center of the inside leg (this will help the feet face forward), and chain 1. Now, make sure that the 2 points of decrease on the V4 of the legs are facing forward on BOTH feet (these are the fronts of the boots); then join the second leg to the first (Photo 6) with a single crochet. Instructions continue in the next section.
Body
✅ Start with the place where you joined the legs, and continue with the Black thread (Photo 7),
✅ R1: 10 sc, then go to the next st on the second leg, 10 sc. (21 points)
✅ V2: 8 sc, 2 sc in the next st, 12 sc. (22 points)
✅ The legs will now look as shown in Photo 8.
✅ V3: (10 sc, 2 sc in the next st), 2 times. (24 points)
✅ Round 4: (11, 2 sc in the next st), 2 times. (26 sts)
✅ V5: 26 pb. (26 pts)
✅ V6: (11 pb, 1 dism), 2 veces. (24 pts)
✅ R7: 11 sc, change to yellow, 13 sc. (24 points)
✅ R8: 12 sc (yellow sts overlap by 1 st so the color change is less obvious), change to Black, 12 sc. (24 points)
✅ V9: 24 pb. (24 pts)
✅ Stop here to fill both legs. Use the strand of black thread left over from the first leg you made to sew the small hole between the legs where you joined them.
✅ V10: (6 pb, 1 dism), 3 veces. (21 pts)
✅ V11: 21 pb. (21 pts)
✅ V12: (5 pb, 1 dism), 3 veces. (18 pts)
✅ V13: 18 pb. (18 pts)
✅ V14: (4 pb, 1 dism), 3 veces. (15 pts)
✅ Start filling the body.
✅ V15: 15 pb. (15 pts)
✅ V14: (3 pb, 1 dism), 3 veces. (12 pts)
✅ Top off leaving the end to sew. Finish stuffing the body (Photo 9).
✅ Since the head and the body are of different colors, if you sew them directly together, the black stitches will be visible. To hide the stitches, sew the body to the head by inserting your needle behind the head stitch (Photo 10) and then behind the body stitch. Just before you finish sewing the body to the head, add more padding, as needed, to the top of the body or the bottom of the head to make the “neck” join snug.
Arms (make 2)
✅ Use the Light Peach color thread,
✅ V1: 2 cad, 6 bp en el primer p. (6 pts)
✅ V2: 6 pb. (6 pts)
✅ V3: 2 sc in the first st, 5 sc. (7 points)
✅ V4: 1 dism, 5 pb. (6 pts)
✅ Switch to Black thread.
✅ V5-8: 6 bp. (6 pts x 4 rounds in total)
✅ V9: 2 bp in el primer p, 5 bp. (7 pts)
✅ V10-12: 7 sc. (7 sts x 3 rows in total)
✅ Wait to finish off. Stuff the arm with a small amount of stuffing. Then, make 3 sc passing the hook through the two layers on the upper arm (Photo 11). Finish off (Photo 12). Sew the arms on either side of the body, at a slight angle, just below the head.

Hull
✅ Use the Sunflower color thread.
✅ V1: 2 cad, 6 bp en el primer p. (6 pts)
✅ V2: 2 sc in each st around. (12 points)
✅ V3: (1 sc, 2 sc in the next st), 6 times. (18 points)
✅ V4: (2 sc, 2 sc in the next st), 6 times. (24 points)
✅ R5: (3 sc, 2 sc in the next st), 6 times. (30 points)
✅ V6: (4 sc, 2 sc in the next st), 6 times. (36 points)
✅ V7: (5 sc, 2 sc in the next st), 6 times. (42 points)
✅ R8: (6 sc, 2 sc in the next st), 6 times. (48 points)
✅ V9-16: 48 sc. (48 sts x 8 rows in total)
✅ Top off leaving the short end to sew it.
helmet strap
✅ Use the Gray Melange color thread.
✅ Leave a thread at the beginning to sew, and then make 36 ch.
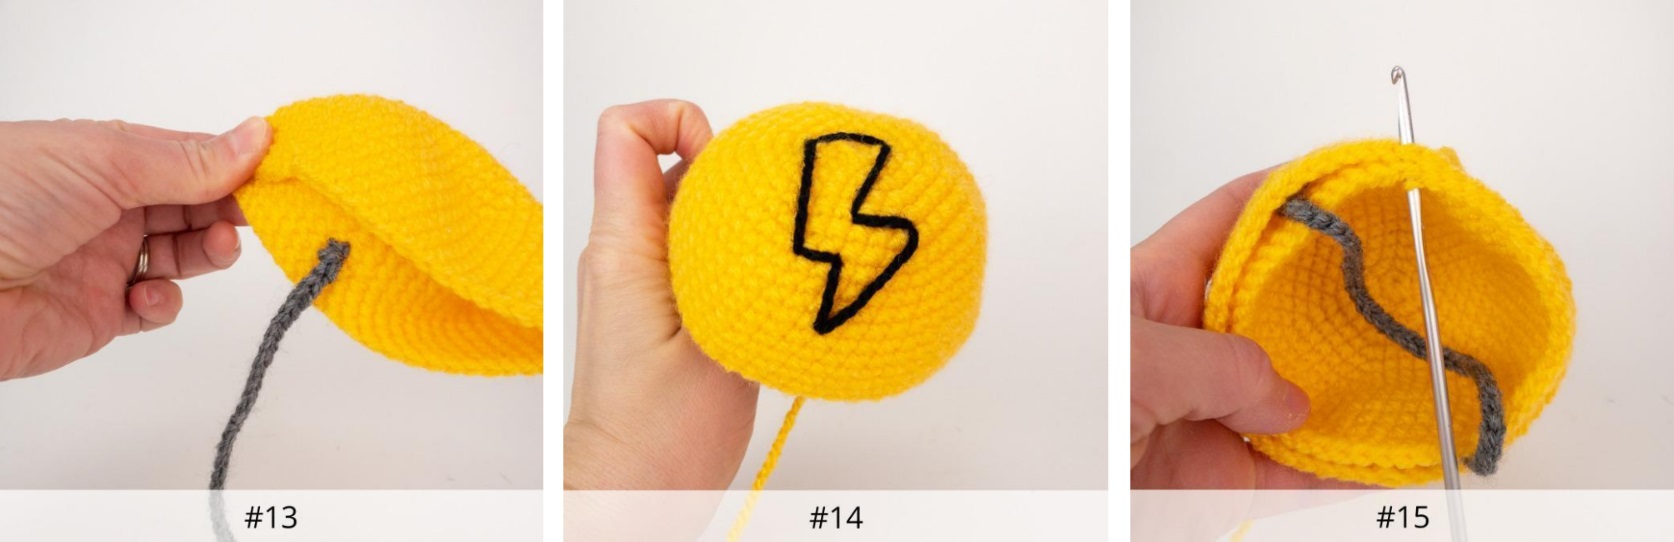
✅ Top off leaving the end to sew it. Place the helmet on your head, then adjust the strap inside the helmet down around your chin so you can see the correct position and sew the straps together for a snug fit. Sew the straps to the inside of the helmet (Photo 13) and secure with a knot. All of these ends will be hidden by the hull insert that you will make next.
✅ Next, cut a long strand of black thread and embroider a lightning bolt on the top of the helmet (Photo 14). He secures the thread with a knot at the leading end of the black thread.
helmet interior
✅ Use the Sunflower color thread.
✅ V1: 2 cad, 6 bp en el primer p. (6 pts)
✅ V2: 2 sc in each st around. (12 points)
✅ V3: (1 sc, 2 sc in the next st), 6 times. (18 points)
✅ V4: (2 sc, 2 sc in the next st), 6 times. (24 points)
✅ R5: (3 sc, 2 sc in the next st), 6 times. (30 points)
✅ V6: (4 sc, 2 sc in the next st), 6 times. (36 points)
✅ V7: (5 sc, 2 sc in the next st), 6 times. (42 points)
✅ R8: (6 sc, 2 sc in the next st), 6 times. (48 points)
✅ V9-14: 48 sc. (48 sts x 6 rows in total)
✅ Wait to finish off. Place the interior you just made inside the helmet and sew it to the helmet all the way around (Photo 15), skipping a stitch to go around the helmet strap. Make a slip stitch to join the first stitch on the round. Finish off and weave in the ends. (Photo 15)
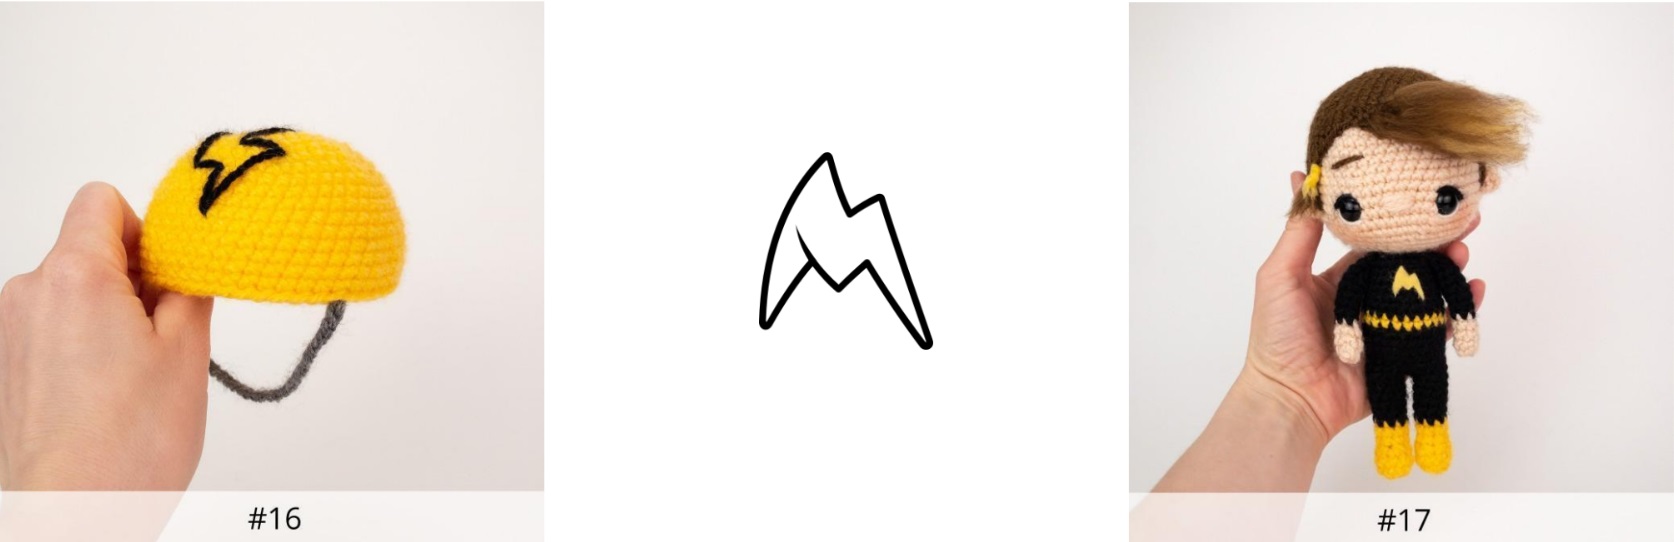
The “M”
✅ For the “M” on the chest, see the template on a real scale. If you print this page at 100% scale, you can use the template to the right to trace the shape onto a piece of yellow felt. Then cut out the felt shape with sharp scissors.
Using fabric glue, glue the felt M to the center front of the chest. (You can also use yellow sewing thread and a sewing needle to sew the felt “M” onto the body.) You’re done! Add a touch of pink to the cheeks with some blush and a makeup brush.